If you’re planning to convert or upgrade a campervan, getting the right electrics sorted is one of the smartest steps you can take. From powering your lights and gadgets to keeping the fridge cool on a hot day, a safe and efficient electrical setup is key to happy, stress-free trips. Whether you’re just getting started or fine-tuning your current camper, this guide walks you through exactly what you need to know about campervan electrics in the UK.
Understanding the Basics: What Electrics Do You Really Need?
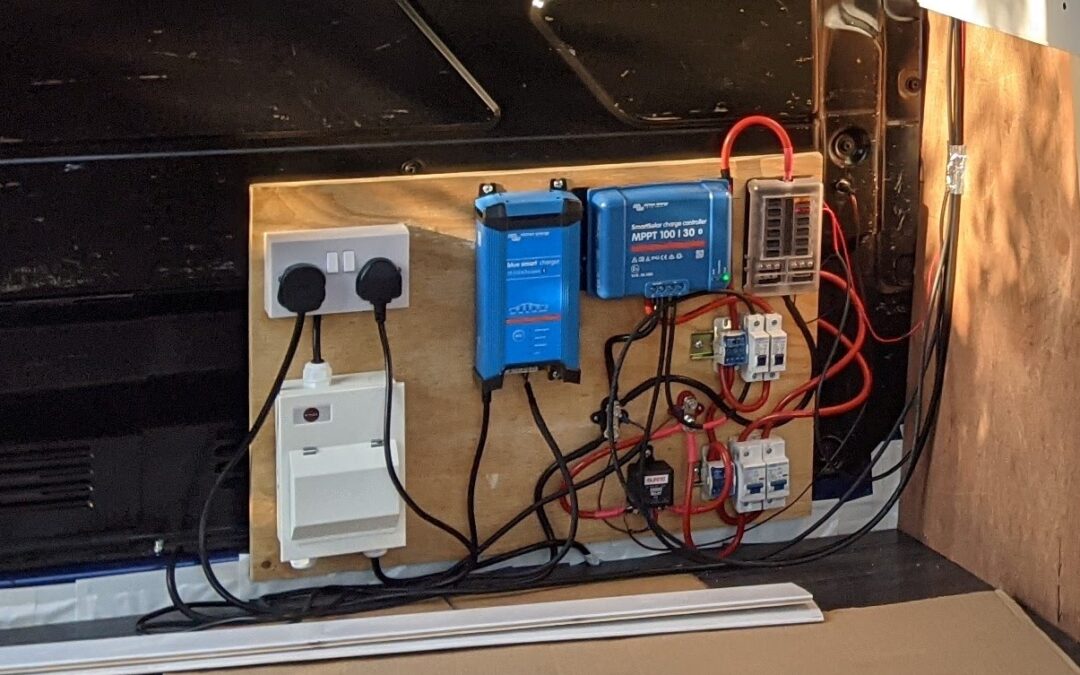
Campervans rely on more than just an ignition battery. At the heart of every setup is a separate leisure battery, which powers your lighting, fridge, water pumps, and small appliances when you’re not plugged in. Most modern setups use 12V systems because they’re efficient and safe for mobile living, but you may also need a way to run 230V mains devices if you want to use laptops or kettles.
A basic campervan electrical kit typically includes:
- Leisure battery or batteries (gives you off-grid power)
- Split charge relay or battery-to-battery charger (charges the leisure battery from the engine) DC wiring and fuses
- A fuse box or consumer unit designed for vehicles
- Main 12V sockets (USB and cigarette-lighter style)
- LED lighting (for efficiency and low draw)
- Switch panels or control units
Optional upgrades include solar panels for renewable power, inverters for running 230V appliances, and extras such as digital battery monitors.
How Do Campervans Get Electricity?
There are three main ways your campervan can source power:
- Leisure Batteries – Your engine alternator charges these while you drive. They store power for use when you’re stationary.
- Hook-up (Mains Connection) – Plug into a campsite’s 230V outlet with an approved hook-up cable. This powers 230V sockets and can top up your leisure batteries via a charger.
- Solar Panels – Increasingly popular for wild campers and longer trips, solar panels charge your leisure battery whenever there’s sunlight.
For most users, a combination of these gives flexibility. Leisure batteries cover your 12V needs, and a mains hook-up or solar keeps everything topped up.
Costs: How Much Does Campervan Electrics Installation Cost?
The cost can range significantly depending on your setup. Here’s a rough breakdown:
Basic DIY install: Expect to pay £300–£600 for a single-battery system, basic wiring, and simple lights.
Mid-range setup: £800–£1,500 for dual batteries, split charge, solar panel (100W+), upgraded lighting, and a small inverter.
Professional install: Installation by a reputable auto-electrician can add £500–£1,000 on top of hardware, but gives you peace of mind that everything meets electrical safety standards.
If your plans are modest, you can always start with the essentials and add extras like a larger inverter or solar panels later.
Do You Need 230V in a Campervan?
It depends on your needs. Many appliances (lights, fridges, charging phones) happily run on 12V. If you want to use items such as a laptop charger, hair dryer, or microwave, you’ll need 230V power—which is where an inverter comes in.
For weekend trips and simple setups, sticking fully to 12V is often simpler and more efficient. However, if you’re travelling full-time or just want all those home comforts, a 230V supply is a realistic upgrade. Remember that using an inverter drains your batteries quickly, so size your battery bank accordingly.
Choosing the Right Inverter and How Big It Should Be
Inverters convert 12V battery power to 230V mains power—handy for charging laptops, running kettles, or other UK appliances. Not all inverters are created equal, though. For campervans, always select a pure sine wave inverter. These are safer for sensitive electronics and run quietly.
How big an inverter do you need?
Add up the wattage of all the devices you want to run at once. For example, a laptop charger (100W), LED TV (50W), and a small blender (200W) would require a 350W inverter at a minimum.
Allow some headroom—go for a 500W inverter if your total is 350W, to prevent overload.
For kettles, hair dryers, or induction hobs, a 1,000W (or larger) inverter is needed, but these draw a lot of power and can drain even big leisure batteries fast.
Look for reputable brands that offer good after-sales service. Our team recommends checking out our dedicated section for campervan inverters to find models suited for UK needs, including compact units and higheroutput options.
Smart Electrical Accessories to Consider
Alongside the core components, a handful of campervan accessories can make your trips much more comfortable:
- USB charging sockets and wireless charging pads
- Touch-activated or dimmable LED lighting solutions
- Compact power management panels with digital readouts
- DC and AC power distribution boxes Extra fuse boxes for safe expansion
Also, consider power-saving appliances, such as a compressor 12v fridge, which are far more efficient than older three-way gas fridges.
Installation Safety Tips
Electrical work in vehicles can be dangerous, so always prioritise safety.
Double-check polarity before connecting appliances: red is usually positive, black negative.
Always use the correct fuse size for every circuit to prevent fire risks.
Route cables neatly and protect them from abrasion.
Use marine- or automotive-grade wire and connectors.
If you’re not confident, consult a professional auto-electrician.
For anyone undertaking bigger upgrades or a full refit, get familiar with basic UK wiring regulations, and never work on live circuits.
Conclusion
Most UK campervans run happily on a basic leisure battery and simple 12V system, but adding solar, an inverter, or extra accessories can make life on the road much more comfortable. Start with essentials, plan for expansion, and always put safety first. For high-quality products and expert advice, browse our campervan electrics section to get everything you need for a safe and reliable setup and enjoy peace of mind on your next trip.